In this post, I will discuss how Muscle Oxygen monitoring is used to determine training intensity zones, and how it compares to the other methods. Specifically, I will analyze how we use our Moxy Monitor device to determine training intensity zones. As you read on, keep in mind that I assume the goal of performing any physiologic assessment is to gain information which can be used to help the athlete train more effectively.
What is Muscle Oxygen Monitoring?
The best answer I have for this question is already written into an eBook. You can download it here.
How to Determine Training Intensity Zones?
The initial assessment protocol for determining training intensity zones with Muscle Oxygen is similar to the protocols for Lactate Threshold or VO2 Max. The athlete performs a graded exercise test where the exercise intensity is increased in small steps at a certain time increment. However, some important details with respect to the Muscle Oxygen protocol are different:
- The athlete starts the test WITHOUT warming up first,
- The test starts at a very low intensity,
- The time at each load step is 5 minutes.
The assessment is run without warming up so that the warm-up can be observed during the test. We want to be able to see what goes on as the athlete transitions from resting to working. We typically see an increase in muscle oxygenation as the athlete warms up. The total hemoglobin may go up or down.
The assessment starts at a very low intensity. There are several reasons for this. First, the body goes into an alarm phase whenever a new load is applied. It has to adjust heart rate, respiratory rate, blood vessel dilation and a whole host of other parameters in order to adapt to the load. Since we’re testing endurance athletes, we’re not as interested in the alarm phase as how things look after the body has adapted to the new load. Starting with a low intensity reduces the magnitude of the alarm reaction when going from resting to working. Second, identifying a recovery intensity zone is part of the goal for setting training intensity zones. In order to see the optimum recovery intensity, we need to test below and above where we think that intensity lies. This requires starting at a very low intensity.
The length of the load step is important to give the body enough time to develop homeostasis at the new load. Experience has shown that three-minute steps are too short, as the athlete just goes from one alarm phase to the next on each new load. Experience also shows that five-minute steps are much better. Longer durations might be even better, but there are some practical limitations on the length of the test.
A typical chart from this type of graded exercise test is shown here:
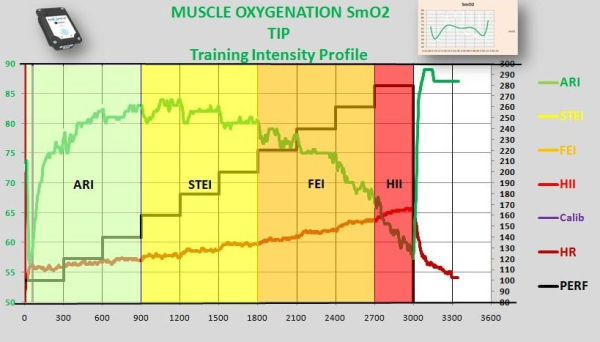
Muscle Oxygen training intensity zones are determined based on how the SmO2 reacts during the test. Typically, we see increasing muscle oxygen during the first couple of load steps. This identifies the Active Recovery Zone.
The next zone is identified by the SmO2 remaining constant over several load steps, which indicates the body is in homeostasis. The body is able to accommodate the increased load primarily by increasing Cardiac Output through increases in Heart Rate and Stroke Volume. This identifies the Structural Endurance Intensity Zone.
The next zone is identified by a decrease in SmO2 with each load step. Think back to the VO2 equation where VO2 equals Cardiac Output multiplied by the arterial – venous oxygen difference. More oxygen delivery is required to adapt to the load. If it can no longer be met by increasing cardiac output alone, the arterial – venous difference needs to be increased to accommodate the load. The body may still be able to regain homeostasis but at a lower SmO2. This is the Functional Endurance Intensity Zone.
As the test continues, the athlete will reach a point where they are unable to continue accommodating the increasing load. Sometimes the athlete transitions to a point where the SmO2 drops rapidly throughout each load. This identifies the High Intensity Zone.
The zone boundaries can be correlated with a heart rate, running pacing, or power level to make it easier for athletes to identify their intensity zone without using a Moxy Muscle Oxygen Monitor.
Discussion
One of the major advantages of using Muscle Oxygen to determine training zones is that it provides data on physiologic changes occuring at each of the transitions between zones. All of the other systems identify one intensity value and then calculate the other zones as fixed percentages of that value.
It’s important to note that not every athlete will produce a “nice” Muscle Oxygen-versus-load profile like in the example shown above. Sometimes the SmO2 doesn’t increase at the beginning. Sometimes we don’t see the rapid decrease near the end. There have even been cases where SmO2 didn’t drop much at all through the whole test. This isn’t a problem with the test. It actually provides great insight into what is limiting the performance of the athlete.
This provides a nice lead in to the next post, where I will discuss how Muscle Oxygen can be used to provide insight into what physiologic system is actually limiting endurance performance for the athlete. An additional test protocol can be run that can help further clarify the training intensity zones, but more importantly, it can show if the athlete is limited by their cardiac, respiratory, or muscular system. This really allows the trainer to create a more personalized training prescription for each athlete.